Quantcast
Channel: butterpaperstudio
Viewing all 2729 articles
Browse latest View live

Stirling HDB Terrace - Broken Planter

$
0
0
yes, after 4 years of growing bamboos, my planter has given way because of the enormous amount of roots and new bamboo shoots the original 3 clumps are producing. Above is the photo of the crack of my planter which is caused by the ever growing roots of the bamboo.
 here's a look at the clump of bamboo that is sprouting really fast and furious.

 Above: Another look at the furthest end of my planter.
 Above: closer look at the crack of my planter
This is the green shade that my bamboo is giving me for the past 4 years and come tuesday, it will be gone!!! Because I'm asking my contractor to hack the planter away before it falls on anybody's feet.
Goodbye lush bamboo!

Stirling HDB Terrace - Organise it!

$
0
0
Went to Howard's Storage and bought something really useful for my staircase store because my dustpan has been in the way of the tiny corridor for years!!
here's how it looks now with the nifty holder holding my broom, dustpan and magic sweep.

DIY - Home Made Stools from IKEA bookshelves and legs from IKEA stool

$
0
0
 Here's what you need:
  1. IKEA MARIUS stool (the legs)
  2. IKEA bookshelf (second hand) - cut into squares, 2 squares for one stool
  3. measuring tape
  4. pencil
  5. jigsaw
  6. wood varnish
  7. screws
  8. wood glue
  9. sandpaper

items which we will be using!

After cutting the bookshelf into perfect squares, we clean the wood pieces as there are some wood dust and shavings. Next we add the wood glue and put 2 pieces of square woods together.

After gluing the 2 pieces of wood together, let it dry then screw 4 at each corner to fasten the 2 pieces of wood together.

Once you are done, varnish the wood pieces to the colour that you like, for us, we have chosen a walnut colour, it's the leftover paint from my DIY IKEA Moppe Hack.
Click here for the DIY.

While hubs is painting the wood pieces, I went to print some number to personalise the stools. Here it is!
So we cut out the numbers and stick it on the wood. Tape on all the sides with newspapers and we are ready for a quick spray paint job.

VOILA!!!
here's the finished product!
And we are going to give these stools to Iron Lady chef for her spanky new place as she is looking for stools for her balcony ceramic table. 
 Here's the top view of the stools with the personalised numbers.
Side view of the stools

xoxo
velle

ps: hope she likes them as much as we do!

DIY IKEA hack stools - Before and After looks

$
0
0
 here's how the ikea book shelves look from Iron lady chef's place.
We thought it was a pity to throw them away so we kept it one side first and thought how we can use it for our DIY project. Then Iron Lady chef was mentioning that she was going in search for a pair of stools for her customised ceramic plate balcony table, so hubs thought perhaps we could use back her bookshelves and make 2 stools for her.
And I'm pleased to show you all our finished DIY IKEA hack stools!

Article 0

$
0
0
Hi all, we will be taking a 2 day break as we all have fallen sick from Jules' deadly flu virus.
The past week he had fever at 39.3 deg and he's well now, but hubs and I together with our helper are all down with cough, runny nose and fever.

*ah-hem*
*cough*
*ahhh-choo!*

Stirling HDB Terrace - Goodbye Bamboo!

$
0
0
BEFORE
NOW


here are some of the before photos for keepsake...and memories.
here's looking at our bamboo from the outside

Reno@Hougang Maisonette - Kitchen island design

$
0
0


The marble that was purchased for the kitchen island is too heavy to be brought up by the lift so we need to improvise here a little.
Iron Lady Chef came up with this idea of using another piece of granite and to shorten the marble piece. I thought it was a great idea seeing that we sort of design the whole theme of her place in black and white with wood so the combi of a black and white stone for her kitchen island seem to pull together a whole new different look.

We did 3 different designs for her to choose, from full cabinetry storage to half open shelving to full open shelving, all has its pros and cons. Open shelvings are good for quick get pots and plates and even cookery books. Full cabinetry storage will minimise dust collection.

So it really depends on her choice now.

xoxo
velle

Stirling HDB Terrace - Updates on our planter - GONE!

$
0
0
here's how it looks like now.
This weekend, our contractor is going to buy some tiles and start tiling works on Monday.

Reno@Bt Panjang - Concept Design

$
0
0
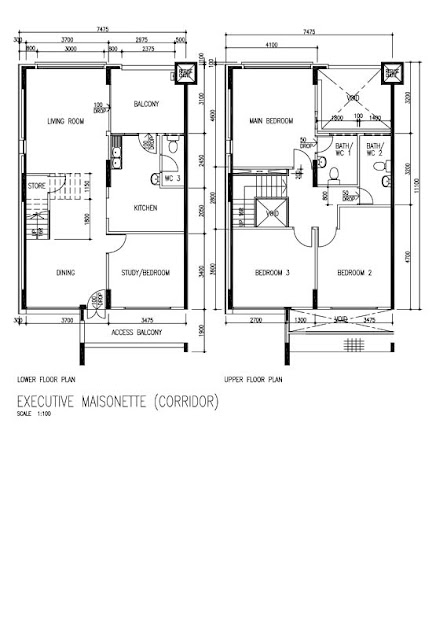
The design revolves mainly in storage planning - simple and neat. The couple already has a specific home-living pattern in the bathrooms, kitchen and bedrooms from their existing home. Hence besides moving their existing furniture and appliances, their current home-living pattern has to reflect very much in the new design.

The best way to have storage is to line them along the longest wall possible, maximise the wall and room space. For the lower floor, the couple wanted storage at the dining for food related stuff and a shoe cabinet. For the study they need to house a helper, ironing board, wardrobe, children's toys, husbands army items and other miscellaneous stuff. The kitchen needs to house 2 washers, 1 dryer, fridge, oven, microwave, sink, hob, hood and if possible to have an island.

For the upper floor, a milk station, full storage outside the common bath, full storage and wardrobe for bedroom 2 and 3, queen size beds in both master and bedroom 3. Master to have wardrobe, study table and storage outside for master bath.

Reno@Bt Panjang - Kitchen island option

$
0
0
Want:
2 full kitchen counters with island in an enclosed kitchen.

Base on the current size of the HDB maisonette layout, there isn't enough space to have an island in an enclosed kitchen. Bearing in mind that the tightest working space for a kitchen is around 900mm - 1000mm. Also with the opening of the fridge door, that corridor space must cater for the door opening and the person opening the door. The optimum width of a kitchen corridor should be around 1100mm to 1200mm, enough for 2 persons to walk pass, or for a drawer in the kitchen to be extended out and good enough for a person to stand.

The design option was to enlarge the kitchen width in order to have a 3 bay counter with the middle bay as an island. This will also utilise the space between the kitchen and the staircase area which most of the time is too wide and under-utilise in most EMs.

Reno@Hougang - Updates

$
0
0
Guess you peeps out there must be dying for some Hougang Reno updates yeah! 
>>>Here you go!!!

above: 
here's a panoramic view of the kitchen. The pantry wall is up, the partition wall between kitchen and yard is also up. Lots of electrical cabling are dangling around the place now. All the walls and joints are all 90deg straight, no more curve edges. Door frames are all in too!
above:
The guys are doing up the brick wall in the living now.
above: 
light holders are all done for the living area, now to put in the light fittings!
above:
here's another view of the living towards the balcony area where the light holder is done too!
here are some close up on the beautiful brick wall in our hougang maisonette!
We did a partition wall to seal up the "gap" between the column and existing wall so that it will be a flat surface and the good thing about this...is that we get to conceal the trunking, wirings and flush the powerpoint with the brick wall!!!! So neat and clean!!!
more photos of the brick wall, above has already been grouted.
see how "smooth" the top of the brick wall is?
the bottom of the brick wall is not finished yet, so it looks very "textured" here
and a new clean DB box is in!

  let's go upstairs!!
and you will see that bedroom 3's wall is totally hacked away!!!!
see how much light and space has been created! 

It was such a pleasant surprise when we saw the opening. Didn't expect the result to be so bright and cheery. Now the stairwell has lots of daylight coming in. 

Bet Iron Lady Chef must be pleased with all the hard work she has been putting into making a decision of getting a PE and chasing the HDB officer for the hacking permit!
More photos of this beautiful "hacked" wall!!! because we waited for its coming for so long!! think it was more than a month...
above:
Master room - light holder completed too.
 let's continue our tour at the bathrooms
False ceiling complete at the master bathroom
 master bath room: light holder is in!

 common bathroom - false ceiling and light holder in too!

 bedroom 3 - light holder in!
  bedroom 2 - light holder in!


stay tune for more updates!
xoxo
velle

Reno@Hougang Maisonette - Looking for Wood

$
0
0
It's saturday morning and we have arranged with Iron Lady Chef to do some wood shopping for her bench and DIY table. So here we are at a wood restoration cum carpenter store in an industrial area where we met the Owner and his mum and dad. Nice folks really.

They have loads of wood and can source the type of wood to the size that you want.
They also do restoration of old pieces and even customise built in carpentry for you.

after walking around the store for awhile, both upstairs and downstairs, hubs and Iron Lady chef both found a piece of wood which they think might be suitable for her DIY bench.
In the meantime, me and Iron Lady Chef's partner were chatting over my pregnancy...hahha
Here's a picture of the mum sanding down the wood for us to see the natural grains as the wood is painted with a red finish. According to her expertise, it should be a timber block from a temple because it is stained in red. Also after sanding down so long, the paint is really thick, she also told us that this is usually coated in pig's blood before they add another layer of red paint so that it can preserve the wood.
 see the natural grains of the wood "coming out" ?
here's a zoom in on the wood!


Reno@TohYi Maisonette - Concept plan

$
0
0
We just met this really nice couple whom we actually share a common friend! How small this world is yah?
The couple was browsing through the internet for maisonette inspirations and IDs and happen to land on my blog and saw our friend at our place having a BBQ! So they emailed us, wanting to meet us and see how things might fall in place. And now we are designing their Toh Yi Maisonette for them!!!

They have 3 kids - and 2 of them are twins!!! So together, their parents, themselves, 3 children and a helper will move from their mum's place over to this maisonette. Phew!

Ok, to cut the story short, here's the design brief:
She likes to have friends over for steamboat and lots of gathering.
Needs the study for the children so the current utility room can't be the helper's room
Hopes to have all the electrical wirings concealed.
Wants as much storage as possible
They will take the master
The bedroom 2 will have an ensuite for their parents.
Bedroom 3 will house their 3 children
Wants to have a roof over the access corridor as theirs is a corner unit
Study in the master but doesn't need a large wardrobe


Reno@TohYi Maisonette - Floorplan

$
0
0
here's a new maisonette which we are doing and it's our first corner unit!
Exciting!

stay tune for more updates!!!

Reno@Bt Panjang Maisonette - Renderings

$
0
0
Here are some renderings which we did for the Bukit Panjang Maisonette
For this maisonette it's all about storage and living patterns. Currently, the couple prefers to have a side table near the dining area for medicines, letters and other miscellaneous stuff so we design a top and bottom cabinet next to the dining area with a glass opening to allow some daylight penetration.
Here will be an area for them to put their food related stuff too while dining.
Next is the 3 bay enclosed kitchen. We are really working in a very tight configuration here as the mistress wants 2 double bowl sinks, stove, hood, French door fridge,  2 washers and dryer all in the kitchen as her current place where she is staying.
Here's a view of the dryer and 2 washers where we are proposing for a blind to be pulled down to hide the laundry area. She also wanted a bar counter where her hubs can watch and chit-chat with her while she cooks.
For the living area, we are using IKEA modules here to build all her cabinetry.
Here's another view of the living from the dining area where we have allocated a small play area for baby kate. This way her parents can look after her while they are resting and watching telly.
Upstairs in the master, we have done a really simple design with a study area and full height tv console. The study area faces both open windows for a breathe of fresh air and natural daylight.
Another look at the master from another angle.

Stirling HDB Terrace - Yard all Tiled up!

$
0
0

We used to have 2 lighting points in the planter box for night lighting, so when the planter was removed, we bought 2 new wall lights for the back yard area and here's a look at what we have gotten for our yard.
Above: a zoom in at our light! Got this from a neighbourhood store in Alexandra Village at our place for $30 inclusive of light bulb.
Here's how it looks from afar...we got the electrician to do a black piping for us to match the outdoor lamp.
Above: Laundry area
Here's how my newly tiled yard looks from my kitchen. Now that the bamboo planter is gone, it's very sunny and bright and there's more space for us to do our laundry drying!!!
Hubs is real happy about it though I really miss the green I used to have at the back of our yard.
Well, everything has its pros and cons. No shade but now i have sun and space for more laundry!

My Ikea Buys this weekend

FLASH FLOOD at Commonwealth Ave!!!!

$
0
0
This morning when i got out of my house and open my gate, I had a shock! The water level was so high that it has gone pass my open drain! The rainwater was above my ankles! And when we got to the carpark, our car was almost "swimming". Lucky the rainwater has not reached the exhaust pipe yet. So hubs was able to drive it to higher grounds where the water wasn't so deep.
hubs with his jeans folded up

hubs taking a photo
Jules with a towel over his head because the brolly was leaking

Flash Flood at Commonwealth Ave
This was taken this morning when we were bringing Jules over to my parents place. The entire road was blocked with plastic white and orange barricades, but the funny thing was, it was "floating" around in the flood!!!!

Reno@Yishun - Pre Reno Photos

$
0
0
Some Pre-Reno photos of the Yishun Flat which we are about to call for quotations from the contractors. Reno is going to start first week of October. As it's a very new flat, there's very little builder's work involved here, mainly electrical work and carpentry. So we are targeting to finish the reno works before christmas!!!

We are DEFINITELY going to do something about this gate.
Although the couple seems ok with it, but i really hate the "abacus" look. Can you see those "beady" things on the vertical stripes of the gate? And there are swirls too!!!

here's an overview of the living room, we will need to lay the floor tiles here as the couple has chosen not to have HDB floor tiles and doors in this BTO exercise.
Here's an overview of the dining area, we are going to do a small little hack into the wall to bring more light into the kitchen. Fengshui master (FSM) also said the same thing, also he mentioned that if we are going to put a door to the kitchen, best to use a glass door to bring in more light.
Hubs holding onto his head here, previously we thought the small niche on the left of the door was the db then now on site, we realised that it's really a niche!!! there's nothing there and to the right of the door is the db!!! which is so big and we wanted to put the shoe cabinet there!!!! ALAMAK.
Above is the view of the master. quite small but still bigger than most condominiums. Bigger than the ones I'm doing. 

Side track a little, things are so busy at work because the main contractor is on board now and next week on, I'm moving to site with my bulging tummy!!! and I'm still haven't finish checking all my kitchen and carpentry drawings!!! Anyway I'm being very kiasu and ganchiong, piling haven't even started yet.
Above: another view of the master where we are going to put the tv console here. Anyway the tv point is already set here. So all's good.
Above: view of the long corridor. we have to lay tiles here and do some false ceiling or cove lights to light up this corridor. And no doors, so we got to buy new doors too.
 Above: view of bedroom 3. We will leave this room empty and just lay tiles.
Above: View of bedroom 2. Going to add the walk in wardrobe here and study table. Going to lay the floor tiles then start on the electrical wirings and carpentry later.
Common bathroom. I don't like the small accent wall tiles at the shower area. Actually I really hate it.
I told the couple that we should do an alcove out to put their shower items and lay a similar colour tile over this then add a glass shower screen to prevent water from splashing out to the WC and sink area.
The sink is also another eye-sore, which the couple agreed too. But we told them that it's such a waste to buy another sink. We'll just make do with this one and do a nice mirror box above. Below the sink, there's really not much we can do here to hide the "pedestal" of the sink. i think open shelving is the best. Something from IKEA might work.
Above: Master toilet. Same small accent wall tiles. Seriously, have you seen this kind of brown grey small tiles in 5star hotel bathrooms at all? HDB thinks that Singaporeans don't travel often is it? How can they propose this kind of toilet tiles for home buyers? They should just leave it plain and simple. Maybe mosaic might be nicer. For the sink, the couple really want to change for the master. So we think it's better that way too.
 Household shelter is tiled. and quite a good choice of tile I must say! NICE!
Here's a look at the kitchen where the FSM say it's too dark, must bring in more light. So we will try to hack a window opening to the left of the bifold door to bring more light in from the yard. But HDB puts a powerpoint there!!! And we don't want to touch that electrical wiring. So the window on the left will be higher than the right which I told the couple and they said they didn't mind. Sigh, actually what can they do right since HDB already put the powerpoint there.
Furthermore, behind this wall is the water pipe and powerpoint for the washer too! So it's definitely involves the electrician and plumber if we want to hack the window opening to match the one on the right.
Here's a look at the yard, see the water tap on the left? that's where the window opening is suppose to be if it was to flush with the window on the right.


above: view of kitchen from yard.

stay tune for the 4room Yishun transformation!
xoxo
velle

Reno@Kovan Maisonette - Tile Selection!

$
0
0
The design for Kovan Maisonette calls for something resort feel and colour scheme to follow the FSM advice. So downstairs, we are proposing for birch looking cabinets for the kitchen area and wood tiles to give it a more resort and balmy feel.
For the toilets, there's going to feature wall and floor in both master and common bath. It's going to be an "L" shape feature thing that continues from wall to floor. Something similar to the Hougang Maisonette balcony area where we tile the walls and floor in the same tile.

The bathroom downstairs, we are going to keep it simple because it's quite small. So the lighter the tile selection, the brighter and "bigger" it will appear to be.
above: The whole selection of tiles for Kovan Maisonette - 11 different tiles!!!
Viewing all 2729 articles
Browse latest View live


<script src="https://jsc.adskeeper.com/r/s/rssing.com.1596347.js" async> </script>